

CASE Construction 410, 420 Skid Steer Loader Service Manual 6-78950 English
Official Manual Overview
Unlock the definitive factory Service Manual for the CASE 410 and 420 Skid Steer Loaders. Engineered for advanced technicians, this heavy-duty binder delivers uncompromising diagnostic and overhaul procedures for the complete hydrostatic drive and chassis systems. It provides deep-level teardown instructions for the Sauer-Danfoss tandem axial piston pumps and Eaton/Rexroth radial piston drive motors, alongside precise pressure testing protocols utilizing the factory CAS-1804 / CAS-1808 flowmeter kits. Furthermore, it features an exhaustive electrical topography section with over 26 distinct frames of connector schematics and dedicated troubleshooting logic for "hacking" and calibrating the Electronic Instrument Cluster (EIC). Please note: As dictated by the manufacturer, this guide thoroughly covers engine/radiator extraction, but internal diesel engine machining and fuel system overhauls are relegated to a separate dedicated engine manual.
- Brands: CASE Construction
- Equipment Type: Skid Steer Loader
- Manuals Type: Service Manual
- Machine Model: 410, 420
- Serial Number: All Serial Numbers
- Region: N/R
- Book Code: 6-78950
- Issued: Printed in U.S.A. February, 2005
- Language: English
- Pages: 468
- File Format: PDF (Searchable)
Selling Points
- Sauer-Sundstrand & Eaton Driveline Overhaul: Bypass the dealership and rebuild the hydrostatic core in-house. This manual delivers clinical teardown procedures for the Sauer-Sundstrand Model 46 Tandem Axial Piston Pump and Eaton drive motors. It dictates absolute fastening protocols, explicitly requiring the spring-applied brake cover plate socket head cap screws to be locked down to exactly 14 to 16 Nm (10 to 12 lb-ft) in an alternating sequence to prevent hydraulic blowouts.
- Dynamic Hydraulic Flow Benchmarking: Calibrate the loader's lifting and driving capabilities to factory baseline limits. The guide provides the exact U.S. and Metric pressure matrices for the equipment gear pump, demanding flow validation at 97 bar, 124 bar, and 152 bar strictly at 2200 r/min. It completely maps out the 3-spool loader control valve logic for lift, tilt, and auxiliary circuits.
- Advanced EIC Telemetry Configuration: Take master control over the Electronic Instrument Cluster (EIC). The manual reveals the hidden push-button sequences (using the work light and park brake buttons) to enter the restricted "SETUP" mode. It guides technicians on how to digitally toggle the engine preheat profiles between "CASE" and "ISM" configurations, ensuring the cold-start relay fires with perfect timing.
Features & Highlights
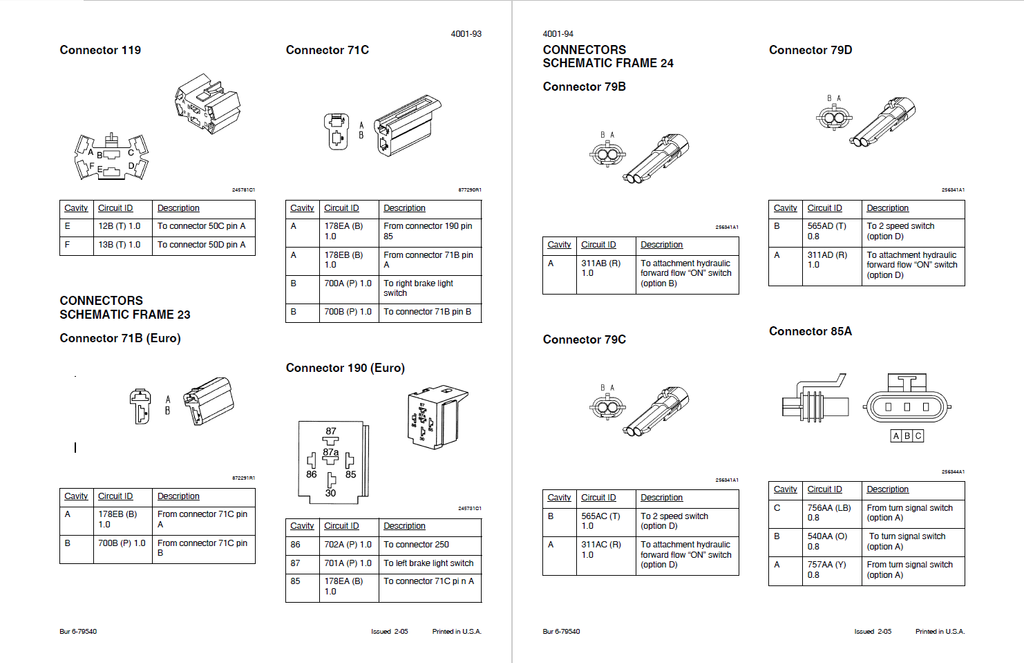
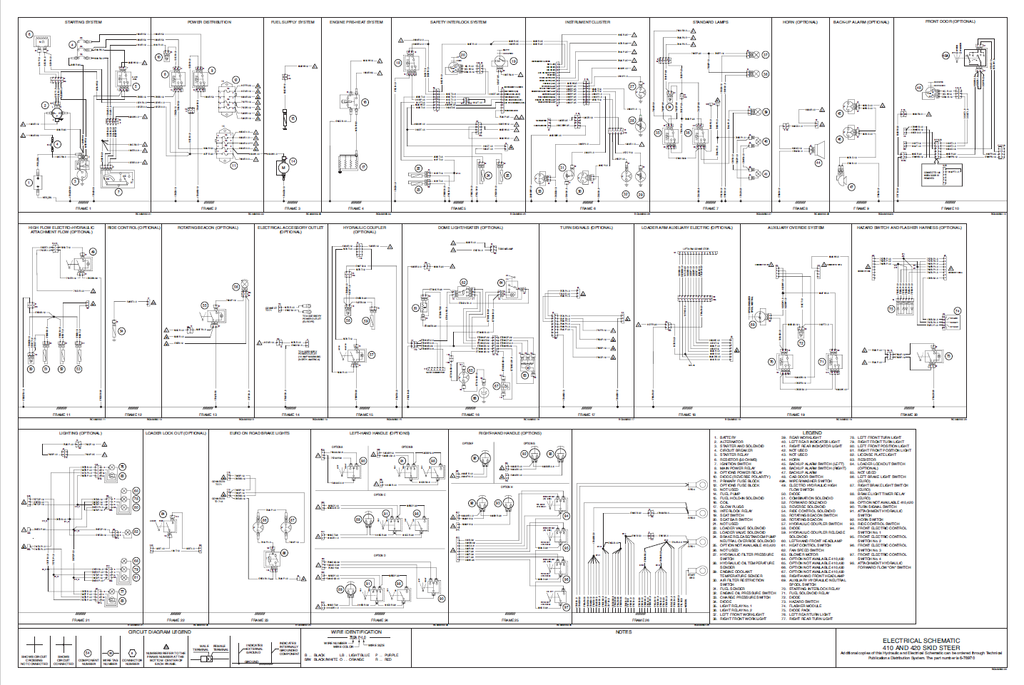
- Massive 26-Frame Electrical Topography: Dominate the complex skid steer wiring harness through 26 dedicated master electrical frames and 25 exhaustive connector pinout diagrams. It removes all electrical guesswork, allowing a technician to isolate the engine oil pressure switch by probing Wire 255C, looking for exactly 12 volts if the engine running pressure drops below 70 kPa (10 psi).
- Extreme-Torque Hydrostatic Diagnostics: Test the structural limits of the drive system before opening the casing. The troubleshooting matrix provides absolute maximum output specifications, defining the low-range motor torque at relief pressure (and 90% efficiency) as a massive 2019 Nm (1489.1 lb-ft), allowing you to instantly isolate mechanical wear from hydraulic fluid degradation.
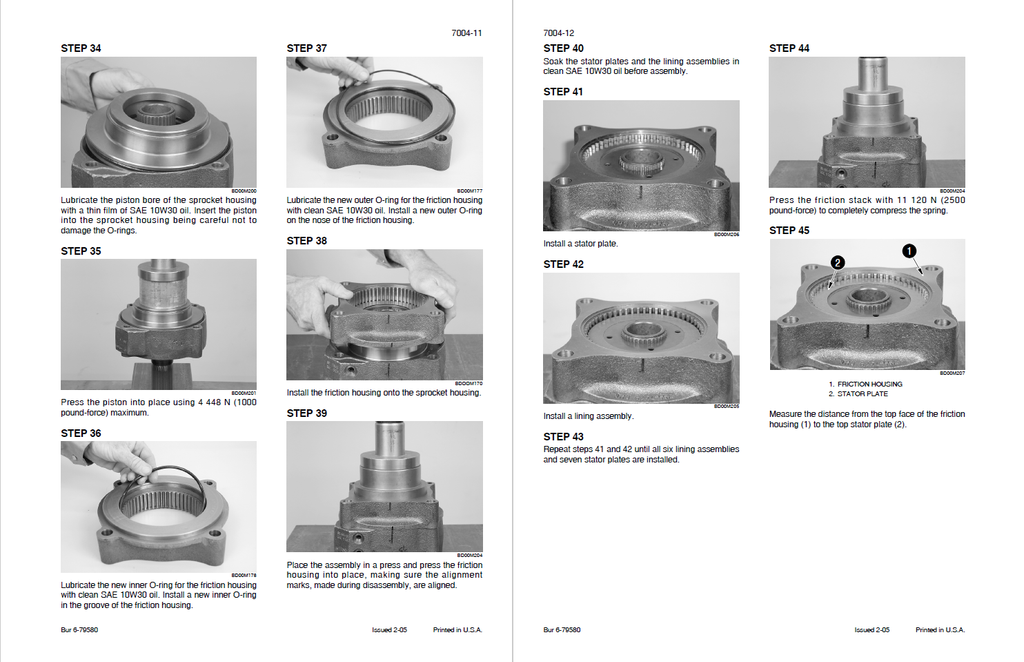
- Spring-Applied Brake Restoration: Maintain absolute safety compliance with detailed rebuild instructions for the hydraulic release brake system. It meticulously illustrates the assembly order of the friction discs, shims, and Belleville springs, ensuring the drive motors lock up instantly when pilot pressure is removed.
Problem Solver
- Defeating Safety Interlock Lockouts: When the skid steer refuses to move or cycle the loader arms, the electrical matrix isolates the exact faulty relay. It guides you to test the seat switch and seat bar proximity sensors, verifying continuity across the 313D and 303C circuits to the Instrument Cluster (Pin 14) so you can cure phantom lockouts rather than replacing expensive solenoids.
- Eradicating Phantom Warning Chimes: Stop chasing imaginary engine overheats. If the dashboard triggers a critical stop warning, the troubleshooting trees walk you through testing the thermistor circuits, specifically isolating a failed 264A (Yellow) hydraulic oil temperature sender from a damaged EIC motherboard.
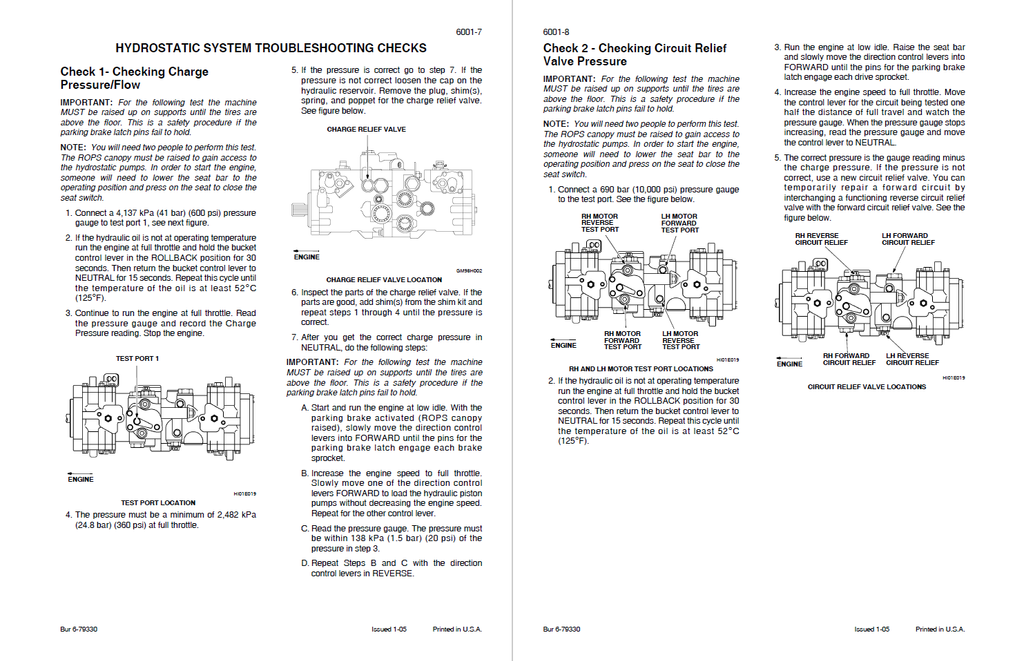
- Curing Charge Pressure Loss: If the machine experiences drive hesitation or power loss under load, the manual forces a systematic charge pressure test using the factory diagnostic ports. It prevents unnecessary tandem pump replacements by verifying full throttle vs. rated engine speeds and inspecting the tow valves before dismantling the hydrostatic loop.
⚠️ Important Fitment & Coverage Note:As explicitly mandated by the manufacturer in the Section Index: "For Engine Repair - See Engine Service Manual" and "For Fuel System Repair - See the Engine Service Manual." This manual comprehensively details the engine removal, radiator installation, and hydrostatic mating procedures, but it absolutely does not contain the internal machining, honing, or fuel injection pump timing procedures for the diesel engine block.
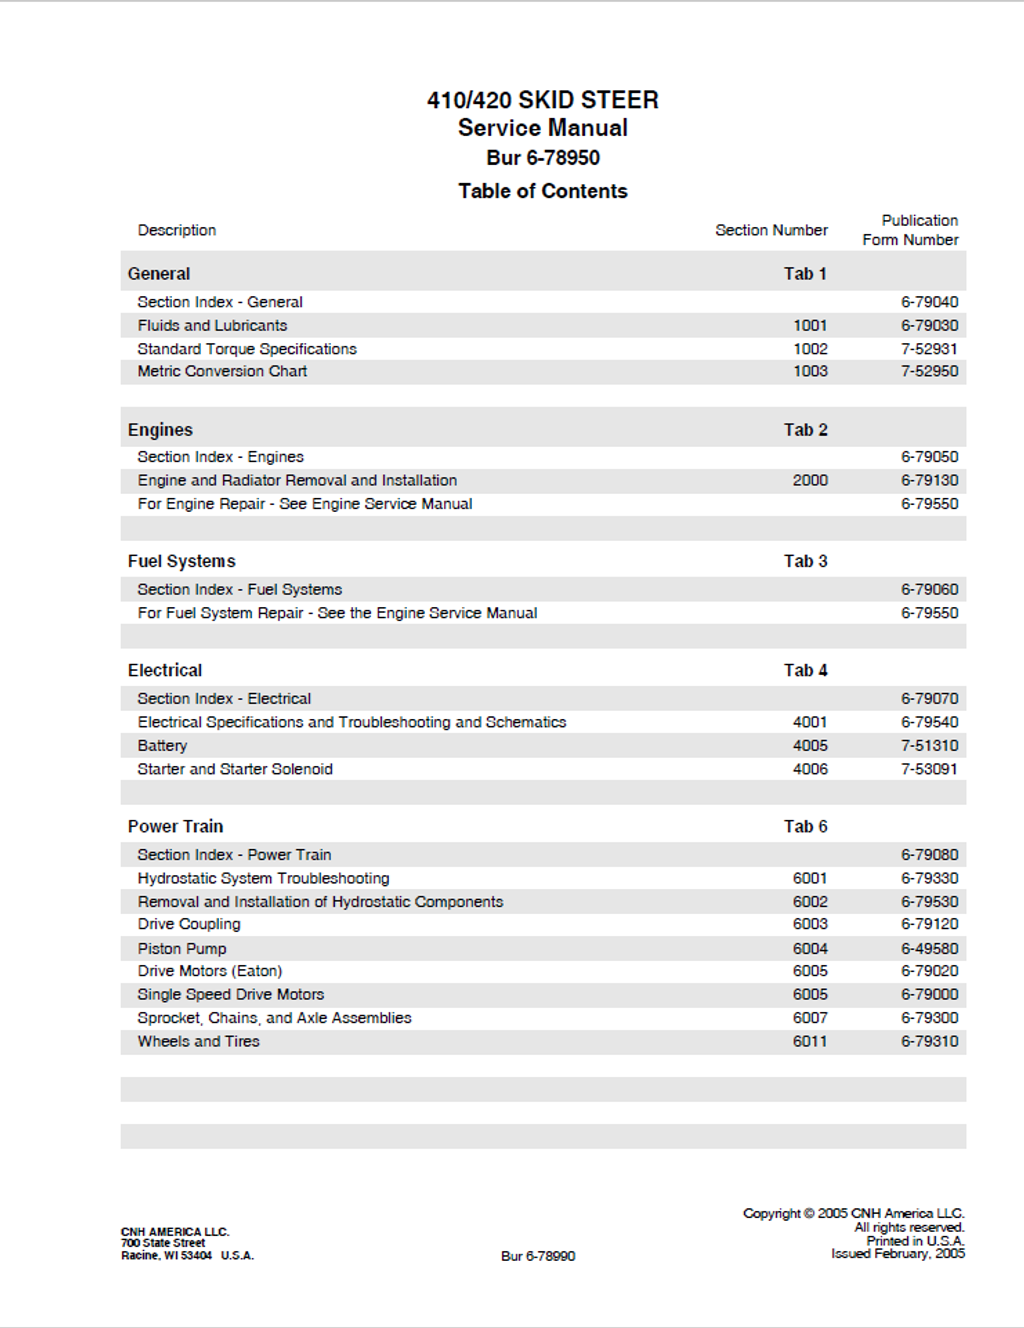
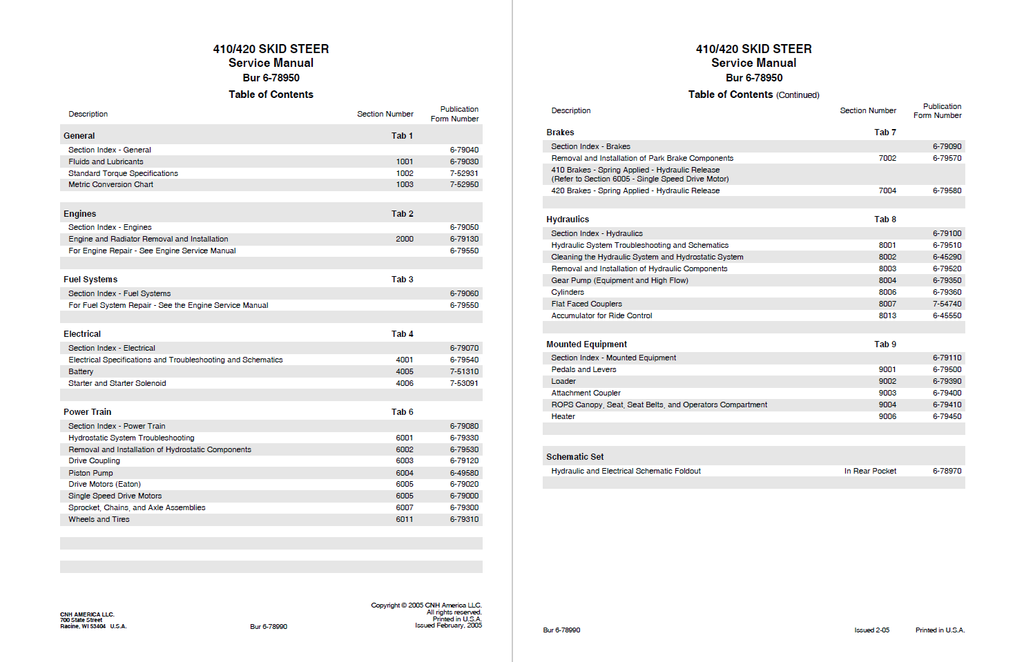
Table of Contents
- GENERAL
- Section Index - General
- Fluids and Lubricants
- Standard Torque Specifications
- Metric Conversion Chart
- ENGINES
- Section Index - Engines
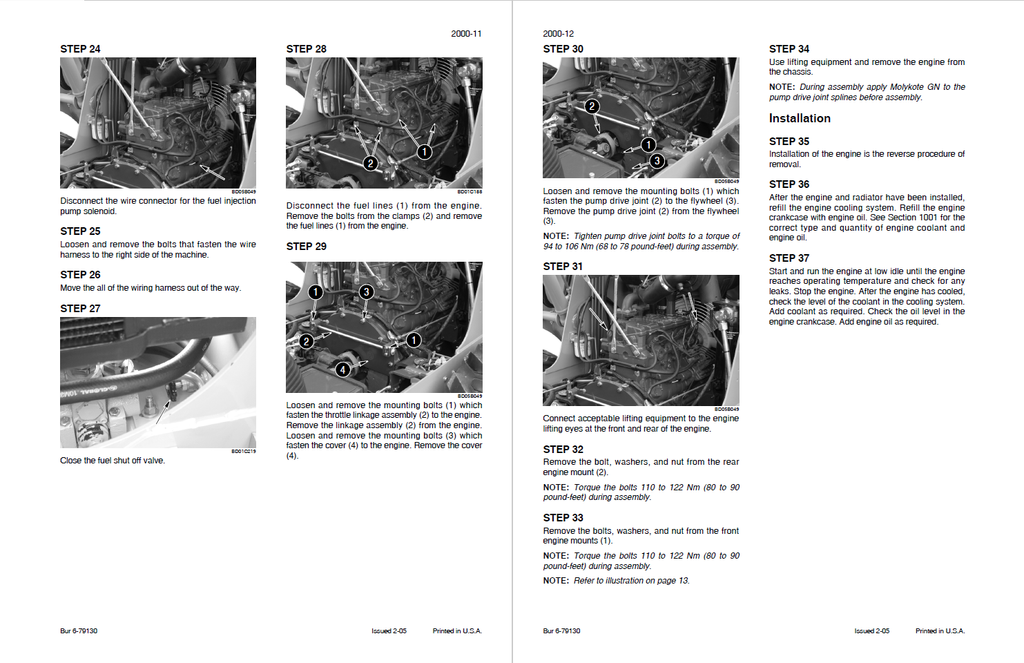
- Engine and Radiator Removal and Installation
- FUEL SYSTEMS
- Section Index - Fuel Systems
- ELECTRICAL
- Section Index - Electrical
- Electrical Specifications and Troubleshooting and Schematics
- TROUBLESHOOTING
- ELECTRICAL SCHEMATIC FRAME 1
- ELECTRICAL SCHEMATIC FRAME 2
- ELECTRICAL SCHEMATIC FRAME 3
- ELECTRICAL SCHEMATIC FRAME 4
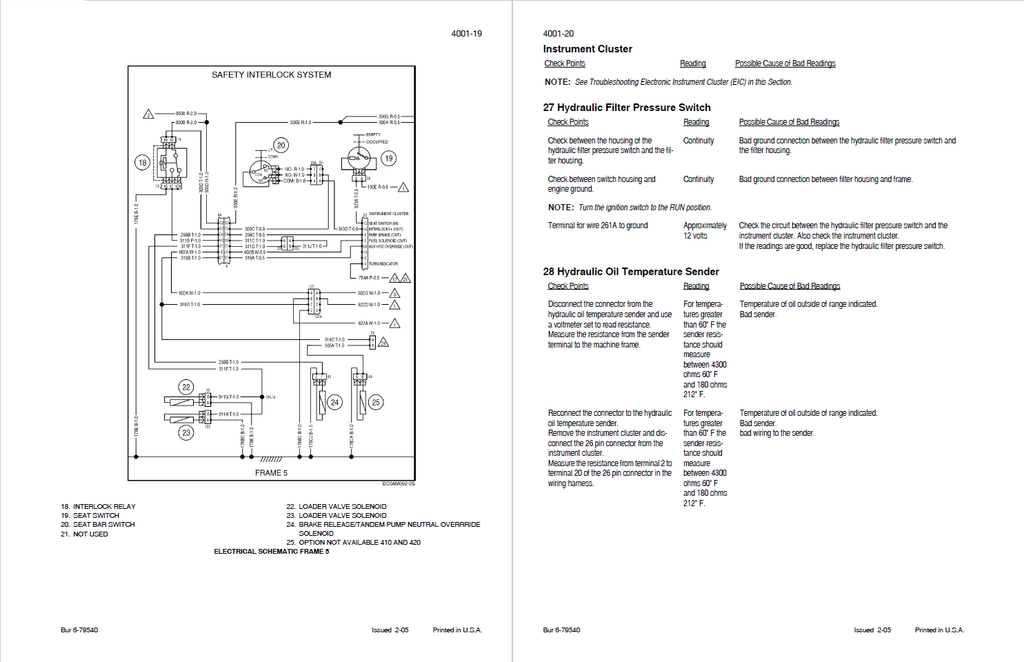
- ELECTRICAL SCHEMATIC FRAME 5
- ELECTRICAL SCHEMATIC FRAME 6
- ELECTRICAL SCHEMATIC FRAME 7
- ELECTRICAL SCHEMATIC FRAME 8
- ELECTRICAL SCHEMATIC FRAME 9
- ELECTRICAL SCHEMATIC FRAME 10
- ELECTRICAL SCHEMATIC FRAME 11
- ELECTRICAL SCHEMATIC FRAME 12
- ELECTRICAL SCHEMATIC FRAME 13
- ELECTRICAL SCHEMATIC FRAME 14
- ELECTRICAL SCHEMATIC FRAME 15
- ELECTRICAL SCHEMATIC FRAME 16
- ELECTRICAL SCHEMATIC FRAME 17
- ELECTRICAL SCHEMATIC FRAME 18
- ELECTRICAL SCHEMATIC FRAME 19
- ELECTRICAL SCHEMATIC FRAME 20
- ELECTRICAL SCHEMATIC FRAME 21
- ELECTRICAL SCHEMATIC FRAME 22
- ELECTRICAL SCHEMATIC FRAME 23
- ELECTRICAL SCHEMATIC FRAME 24
- ELECTRICAL SCHEMATIC FRAME 25
- ELECTRICAL SCHEMATIC FRAME 26
- CONNECTORS SCHEMATIC FRAME 1
- Connector 4 Alternator
- Connector 7 Starter Relay
- Connector 8
- Connector 8A
- Connector 9 Ignition Switch
- Connector 52
- Connector 52A
- CONNECTORS SCHEMATIC FRAME 2
- Connector 14 Main Power Relay
- Connector 25
- Connector 64 Options Power Relay
- CONNECTORS SCHEMATIC FRAME 3
- Connector 60
- CONNECTORS SCHEMATIC FRAME 5
- Connector 8A
- Connector 8
- Connector 18 Interlock Relay
- Connector 23 Instrument Cluster
- Connector 50
- Connector 57
- Connector 58
- Connector 59
- Connector 79
- Connector 80
- Connector 103
- Connector 127
- Connector 127A
- CONNECTORS SCHEMATIC FRAME 6
- Connector 8
- Connector 8A
- Connector 23 Instrument Cluster
- Connector 29
- Connector 30
- Connector 52
- Connector 52A
- CONNECTORS SCHEMATIC FRAME 7
- Connector 8
- Connector 8A
- Connector 32
- Connector 33
- Connector 34
- Connector 93
- Connector 96
- Connector 99
- CONNECTORS SCHEMATIC FRAME 8
- Connector 39 (Grey)
- CONNECTORS SCHEMATIC FRAME 10
- Connector 50A
- Connector 51
- Connector 51A
- Connector 65
- Connector 65A
- Connector 112
- Connector 113
- Connector 140
- Connector 140A
- Connector 141 Wiper/Washer Switch
- CONNECTORS SCHEMATIC FRAME 11
- Connector 70
- Connector 70A
- Connector 72
- Connector 81
- Connector 81B
- Connector 120
- Connector 121
- Connector 122
- Connector 123
- Connector 124
- CONNECTORS SCHEMATIC FRAME 12
- Connector 77
- CONNECTORS SCHEMATIC FRAME 13
- Connector 67
- Connector 68
- CONNECTORS SCHEMATIC FRAME 14
- Connector 71
- Connector 71A (Euro)
- CONNECTORS SCHEMATIC FRAME 15
- Connector 70
- Connector 70A
- Connector 73
- Connector 75
- Connector 76
- Connector 115
- Connector 115A
- CONNECTORS SCHEMATIC FRAME 16
- Connector 69
- Connector 117
- Connector 117A
- Connector 170
- Connector 171
- Connector 174
- Connector 175
- Connector 176
- CONNECTORS SCHEMATIC FRAME 17
- Connector 66
- Connector 66A
- Connector 85
- Connector 86
- CONNECTORS SCHEMATIC FRAME 18
- Connector 49
- Connector 107
- Connector 138
- Connector 138A
- Connector 150
- Connector 150A
- CONNECTORS SCHEMATIC FRAME 19
- Connector 125
- Connector 127B
- Connector 127C
- Connector 128
- Connector 129
- Connector 130
- CONNECTORS SCHEMATIC FRAME 20
- Connector 66B
- Connector 66C
- Connector 92
- Connector 275
- Connector 276
- CONNECTORS SCHEMATIC FRAME 21
- Connector 86B
- Connector 226
- Connector 227
- Connector 228
- Connector 229
- Connector 230
- CONNECTORS SCHEMATIC FRAME 22
- Connector 50C
- Connector 50D
- Connector 119
- CONNECTORS SCHEMATIC FRAME 23
- Connector 71B (Euro)
- Connector 71C
- Connector 190 (Euro)
- CONNECTORS SCHEMATIC FRAME 24
- Connector 79B
- Connector 79C
- Connector 79D
- Connector 85A
- Connector 85D
- Connector 123B
- Connector 123C
- Connector 123D
- CONNECTORS SCHEMATIC FRAME 25
- Connector 39F
- Connector 39G
- Connector 39H
- Connector 49H
- Connector 77H
- Electronic Instrument CONSOLE (EIC)
- SWITCH PANEL
- Electronic Instrument PANEL (EIC)
- Electronic Instrument Cluster (EIC) Operating Instructions
- Special Feature Choices
- Detailed Description of Setup Items
- TROUBLESHOOTING ELECTRONIC INSTRUMENT CLUSTER (EIC)
- GENERAL INFORMATION
- Circuit Diagram Legends
- Battery
- SAFETY RULES
- MAINTENANCE
- General Information
- Test Equipment
- Test Procedure
- DISASSEMBLY
- INSPECTION
- Brushes and Brush Springs
- Brush Holder
- Armature
- Field Coil Test
- Starter and Starter Solenoid
- POWER TRAIN
- Section Index - Power Train
- Hydrostatic System Troubleshooting
- SPECIFICATIONS
- SPECIAL TOOLS
- SAFETY RULES
- CHECKS TO DO BEFORE TROUBLESHOOTING
- HYDROSTATIC SYSTEM TROUBLESHOOTING
- Removal and Installation of Hydrostatic Components
- Drive Coupling
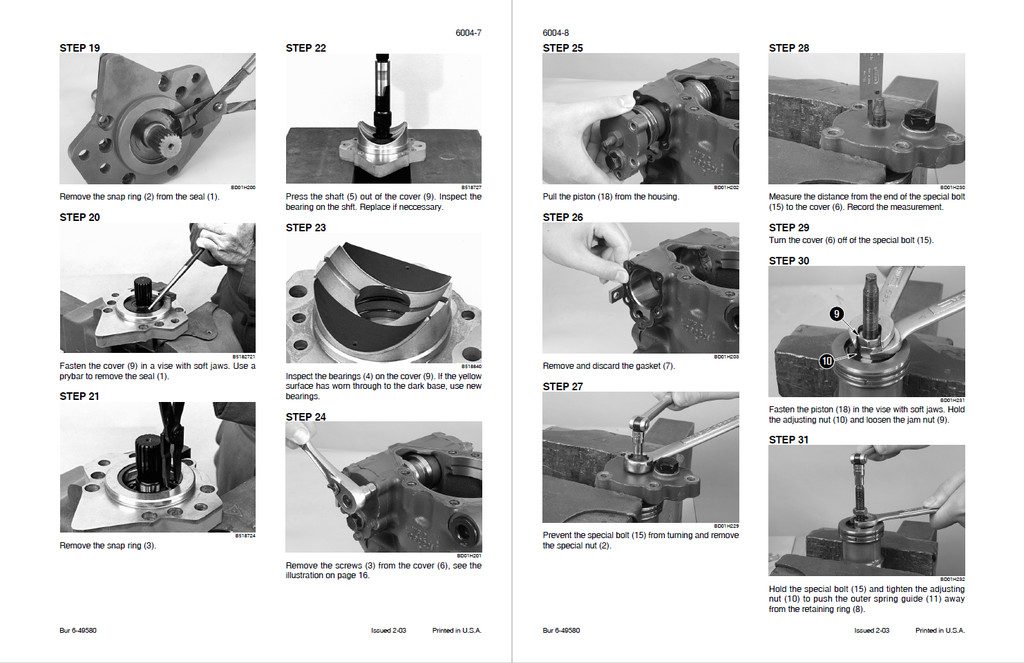
- Piston Pump
- Disassembly
- Inspection
- Assembly
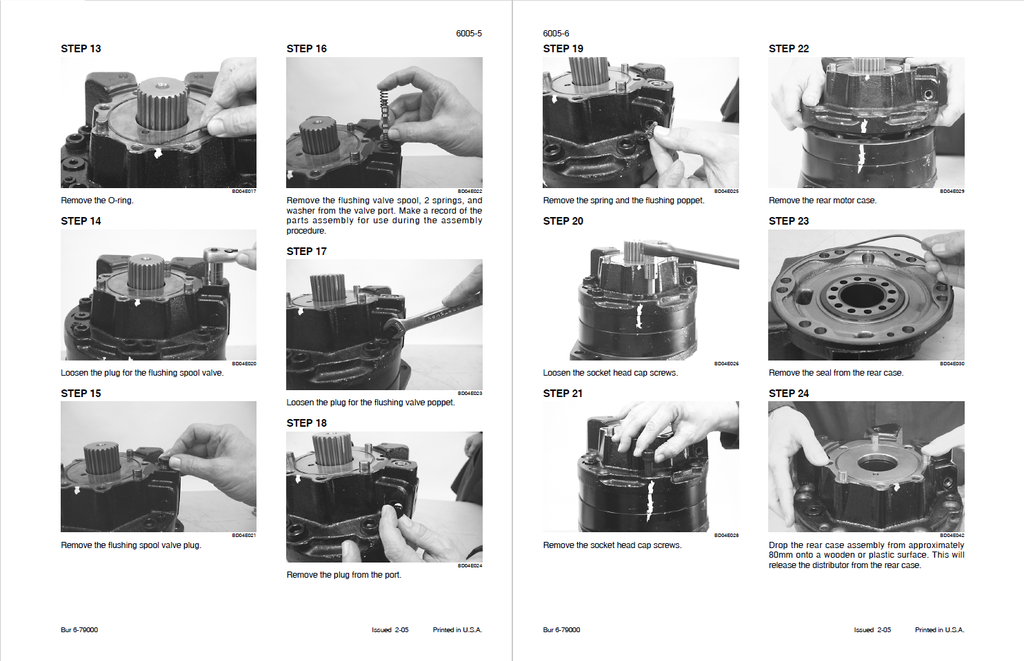
- Drive Motors (Eaton)
- Single Speed Drive Motors
- Disassembly
- Inspection
- Assembly
- Sprockets, Chains, and Axle Assemblies
- Wheels and Tires
- BRAKES
- REMOVAL AND INSTALLATION OF PARK BRAKE COMPONENTS
- SPECIFICATIONS
- Safety Rules
- REMOVAL AND INSTALLATION OF PARK BRAKE COMPONENTS
- HYDRAULICS
- HYDRAULIC SYSTEM TROUBLESHOOTING AND SCHEMATICS
- SPECIFICATIONS
- SPECIAL TOOLS
- PRESSURE CHECKS
- 3 SPOOL LOADER CONTROL VALVE SCHEMATIC
- LOADER CONTROL VALVE
- METRIC MEASURE CHECK SHEET
- U.S. MEASURE CHECK SHEET
- 410 HYDRAULIC SCHEMATIC FRAME 1
- 410 HYDRAULIC SCHEMATIC FRAME 2
- 410 HYDRAULIC SCHEMATIC FRAME 3
- 410 HYDRAULIC SCHEMATIC FRAME 4
- 410 HYDRAULIC SCHEMATIC FRAME 5
- 410 HYDRAULIC SCHEMATIC FRAME 6
- 410 HYDRAULIC SCHEMATIC FRAME 7
- 420 HYDRAULIC SCHEMATIC FRAME 1
- 420 HYDRAULIC SCHEMATIC FRAME 2
- 420 HYDRAULIC SCHEMATIC FRAME 3
- 420 HYDRAULIC SCHEMATIC FRAME 4
- 420 HYDRAULIC SCHEMATIC FRAME 5
- 420 HYDRAULIC SCHEMATIC FRAME 6
- 420 HYDRAULIC SCHEMATIC FRAME 7
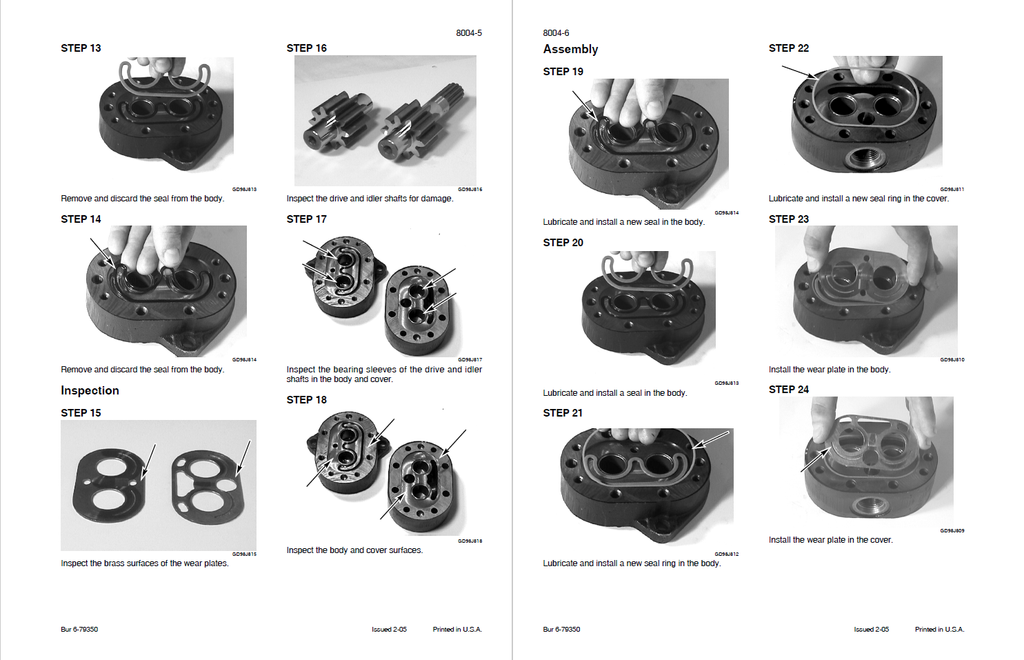
- Gear Pump (Equipment and High Flow)
- Disassembly
- Inspection
- Assembly
- HIGH FLOW PUMP (IF EQUIPPED)
- Removal
- Installation
- HIGH FLOW VALVE (IF EQUIPPED)
- Removal
- Installation
- Cylinders
- Flat Faced Couplers
- Accumulator for Ride Control
- HYDRAULIC SYSTEM TROUBLESHOOTING AND SCHEMATICS
- MOUNTED EQUIPMENT
- Attachment Coupler
- ROPS Canopy, Seat, Seat Belts, and Operators Compartment
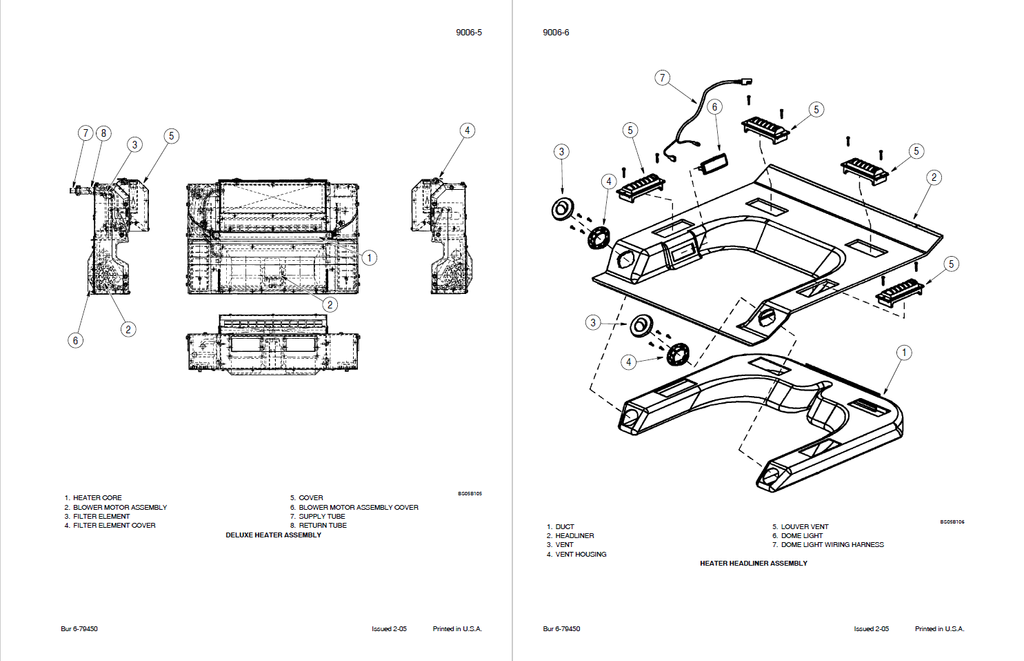
- Heater
- PEDALS AND LEVERS
- SPECIFICATIONS
- THROTTLE CONTROL lever ADJUSTMENT
- LOADER
- REPLACING THE CUTTING EDGE ON BUCKETS
- Replacing Welded Cutting Edges
- Replacing Bolt-On Cutting Edges
- REPLACING THE CUTTING EDGE ON BUCKETS
- SCHEMATICS
- Schematic Set Hydraulic and Electrical Schematic Foldout In Rear Pocket